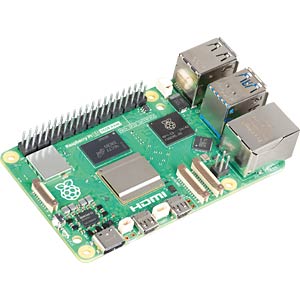
Running Jellyfin on a Raspberry Pi 5
What You Need
- Raspberry Pi 5 (4/8 GB)
- MicroSD 32GB+ or NVMe SSD
- USB hard drive for media
- Official 27W USB-C PSU
- Ethernet cable
- Active cooler
Step 1: Install OS
Flash Raspberry Pi OS Lite (64-bit) with Pi Imager. Enable SSH.
Step 2: Configure
ssh pi@jellyfin.local
sudo apt update && sudo apt upgrade -y
Step 3: Mount Media Drive
sudo mkdir -p /media/storage
echo "/dev/sda1 /media/storage ext4 defaults,nofail 0 0" | sudo tee -a /etc/fstab
sudo mount -a
Step 4: Install Jellyfin
curl -fsSL https://repo.jellyfin.org/install-debuntu.sh | sudo bash
sudo systemctl enable --now jellyfin
Access: http://192.168.1.100:8096
Performance Tips
- Direct Play only - Pi 5 has no HW transcoding
- Use NVMe HAT for faster scanning
- Set
gpu_mem=16in config.txt - Use H.264 MP4 for max compatibility
Limitations
- No hardware transcoding
- 2-3 direct play streams max
- USB 3.0 bandwidth limit
Monitor your Pi server with JellyWatch - track CPU usage, storage space, and active streams without touching the Pi.
Running Jellyfin on a Pi? Keep an eye on it remotely. Download JellyWatch on Google Play - server health and session monitoring on your Android phone.
A $100 media server in your palm.
Pi 5 vs Intel N100: When Should You Upgrade?
The Raspberry Pi 5 is a fantastic entry point, but the Intel N100 mini PC has become the go-to upgrade path. Here is an honest comparison to help you decide.
Head-to-Head Comparison
| Criteria | Raspberry Pi 5 (8 GB) | Intel N100 Mini PC |
|---|---|---|
| Price | ~$150-180 complete | |
| CPU | ARM Cortex-A76 (4 cores, 2.4 GHz) | x86 Alder Lake-N (4 cores, 3.4 GHz boost) |
| RAM | 8 GB LPDDR4X | 8-16 GB DDR4/DDR5 |
| Hardware transcoding | None | Intel Quick Sync (H.264, H.265, AV1 decode) |
| Simultaneous streams | 2-3 Direct Play only | 5-8 (transcoding included) |
| Power consumption | 12-15W | 20-30W |
| Storage | MicroSD or NVMe HAT | Built-in NVMe M.2 slot |
| 4K playback | Direct Play only, no HDR tone-mapping | Full 4K transcode + HDR tone-mapping |
| Noise | Silent (with passive cooler) | Silent (fanless models available) |
When to Stay on Pi 5
- You have 1-3 users who all Direct Play (compatible clients)
- Your library is already encoded in H.264/H.265 with AAC audio
- You want the lowest power bill possible
- You enjoy the Pi ecosystem (GPIO, Pi-hole on the same device, etc.)
- Budget is under $100
When to Upgrade to N100
- You have 4+ users or users on varied devices (browsers, phones, old TVs)
- You need hardware transcoding (users cannot always Direct Play)
- You want HDR tone-mapping for 4K content on SDR displays
- You plan to run the full *arr stack (Radarr, Sonarr, Bazarr) alongside Jellyfin
- You want native NVMe storage without adapters
The Verdict
The Pi 5 is perfect for a personal or small family server where everyone uses compatible clients (Jellyfin Media Player, Findroid, Swiftfin). The moment you share your server with friends or have users on web browsers and Samsung TVs, the N100 pays for itself in transcoding capability alone.
Docker vs Native Installation on Raspberry Pi 5
Both methods work on the Pi 5, but they have different trade-offs.
Native Installation (APT)
curl -fsSL https://repo.jellyfin.org/install-debuntu.sh | sudo bash
sudo systemctl enable --now jellyfin
Pros:
- Slightly lower RAM overhead (~50-100 MB less)
- Simpler for single-service setups
- Direct access to hardware without device mapping
- Easier to troubleshoot for Linux beginners
Cons:
- Updates require manual apt commands
- Harder to backup (scattered config files)
- Conflicts possible with other services
- Rollback is difficult if an update breaks things
Docker Installation
services:
  jellyfin:
    image: jellyfin/jellyfin:latest
    container_name: jellyfin
    volumes:
      - ./config:/config
      - ./cache:/cache
      - /media/storage:/media:ro
    ports:
      - 8096:8096
    restart: unless-stopped
sudo apt install docker.io docker-compose-plugin -y
docker compose up -d
Pros:
- One-command updates:
docker compose pull && docker compose up -d - Easy backup: just tar the
./configfolder - Instant rollback: pin a previous image tag
- Run multiple services cleanly (Jellyfin + Radarr + Sonarr + Bazarr)
- Consistent behavior across Pi OS versions
Cons:
- ~200 MB additional RAM overhead for Docker daemon
- Slightly more complex initial setup
- Device passthrough requires explicit mapping
Recommendation for Pi 5
Use Docker if you plan to run any companion services (Radarr, Sonarr, Jellyseerr, Bazarr). The isolation and easy updates are worth the small RAM overhead on an 8 GB Pi 5.
Use native only if Jellyfin is the sole service on the Pi and you want maximum RAM available for library scanning.
Performance Tips for Both Methods
- Use an NVMe SSD via the Pi 5 M.2 HAT for the config/cache - microSD is too slow for metadata scanning
- Set
gpu_mem=16in/boot/firmware/config.txt- Jellyfin does not use the Pi GPU, so free that RAM - Disable swap on microSD if using NVMe - swap on SD cards kills them
- Use an active cooler - sustained library scans will thermal throttle without cooling
- Mount media via USB 3.0 or NFS from a NAS - avoid storing media on the boot drive
Running Jellyfin on a Pi 5? Monitor CPU thermals and stream count remotely. Download JellyWatch on Google Play - see active sessions, CPU load, and storage space on your Android phone without SSHing into the Pi.


Comments 2
Running Jellyfin on my Pi 5 with an NVMe HAT. Direct play only but handles 3 streams no problem. Great little server.
Important note: the Pi 5 really cannot transcode. Make sure all your clients support direct play or you'll have a bad time.
Leave a comment